[Sagemaker] Sagemaker 엔드포인트를 통한 SAM2 배포하기
Amazon SageMaker를 활용해 SAM2 모델을 실시간 추론 엔드포인트로 배포하는 방법을 안내합니다. 이를 통해 이미지 내 특정 객체를 좌표나 박스로 정확하게 분할하는 AI 서비스를 구축할 수 있습니다.
![[Sagemaker] Sagemaker 엔드포인트를 통한 SAM2 배포하기](/content/images/size/w1200/2025/07/128843df-9c99-80da-81fc-e198f9c6d48c.png)
개요
SageMaker Custom Endpoint 배포를 통해 S3에 모델 아티팩트를 업로드한 후, 프레임워크를 기반으로 모델을 생성하고, 적절한 인스턴스 타입과 수량을 설정하여 엔드포인트를 배포할 수 있습니다. 이 과정에서 표준 인터페이스 함수들을 구성하여 엔드포인트의 추론 파이프라인을 구성하는 방법과, 배포 완료 후 RESTful API를 통해 AI 추론하는 것을 직접 테스트하였습니다.
Sagemaker 환경 설정
conda create --name <ENVIRONMENT_NAME> python=3.11
conda activate <ENVIRONMENT_NAME>
conda install ipykernel
python -m ipykernel install --user --name=<ENVIROMENT_NAME> # 환경 추가
jupyter kernelspec list
테스트 환경을 위해 conda를 활용하여 설정합니다. 이후 sam2 경로로 이동해서 setup.py 를 교체합니다.
git clone https://github.com/facebookresearch/sam2.git && cd sam2

pip install -e .
!pip install -e .
apt-get update -y
apt-get install -y libgl1-mesa-glx
apt-get install -y libglib2.0-0
Sagemaker 배포 방법
기계 학습 모델을 훈련한 후 Amazon을 사용하여 배포 SageMaker 하여 예측을 가져올 수 있습니다. Amazon은 사용 사례에 따라 모델을 배포하는 다음과 같은 방법을 SageMaker 지원합니다.
- 한 번에 하나의 예측을 수행하는 영구 실시간 엔드포인트의 경우 실시간 호스팅 서비스를 사용합니다. 실시간 추론을 참조하세요.
- 트래픽 급증 사이에 유휴 기간이 있고 콜드 스타트를 허용할 수 있는 워크로드는 서버리스 추론을 사용합니다. Amazon SageMaker 서버리스 추론을 사용하여 모델 배포하기을 참조하세요.
- 최대 1GB의 큰 페이로드 크기, 긴 처리 시간 및 실시간에 가까운 지연 시간 요구 사항이 있는 요청은 Amazon SageMaker 비동기 추론을 사용합니다. 비동기 추론을 참조하세요.
- 전체 데이터 세트에 대한 예측을 가져오려면 SageMaker 배치 변환을 사용합니다. Amazon을 사용한 추론을 위한 배치 변환 SageMaker을 참조하세요.
위와 같은 배포 방법들 중 다음 문서에서는 실시간 엔드포인트를 사용한 실시간 추론방식을 활용하였습니다.
Sagemaker 배포 테스트
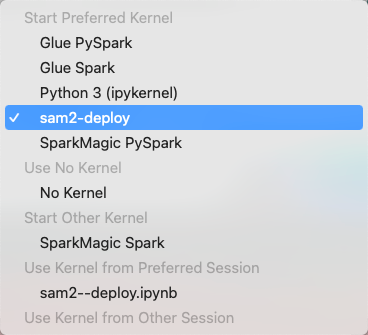
Jupyter 환경에서 노트북을 생성한 뒤 conda 가상 환경 커널과 연결합니다.
우선 SAM2 모델 테스트를 위해 ultralytics 를 설치합니다.
!pip install ultralytics
from ultralytics import SAM

# Load a model
model = SAM("sam2_l.pt")

# Display model information (optional)
model.info()

# Segment with bounding box prompt
# results = model("./notebooks/images/groceries.jpg", bboxes=[100, 100, 200, 200], save=True)

# Segment with point prompt
results = model("./images/groceries.jpg", points=[470, 250], labels=[1])
print(results[0].show())
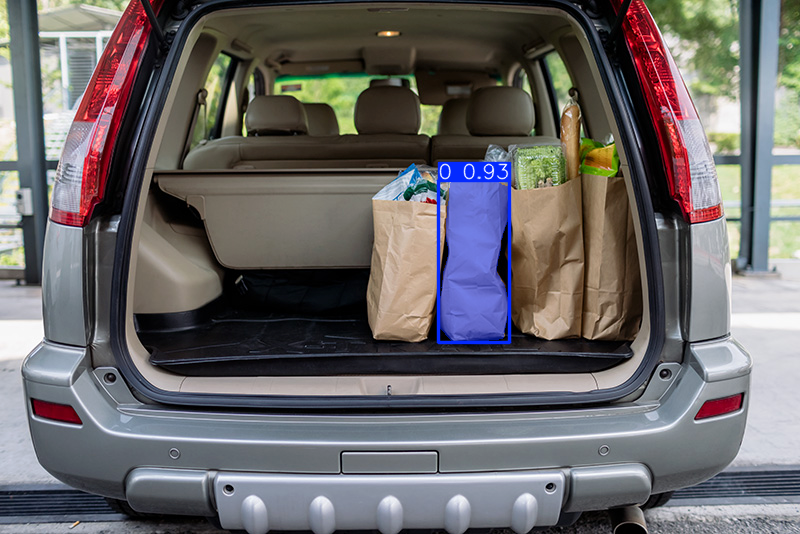
다음과 같은 결과가 출력됩니다.
Sagemaker 배포
sagemaker 배포를 위해선 반드시 구성해야하는 함수들이 존재합니다. SageMaker 배포를 위한 각 함수들은 SageMaker의 모델 서빙 아키텍처에 맞춰 필수적인 역할을 수행하며, 각 함수는 다음과 같습니다.
model_fn(model_dir):- SageMaker가 모델을 로드할 때 사용하는 진입점입니다
- 모델이 배포될 때 저장된 모델 아티팩트를 로드하는 역할을 합니다
input_fn(request_body, request_content_type):- API 엔드포인트로 들어오는 요청 데이터를 처리합니다
- JSON 형식의 입력을 모델이 이해할 수 있는 형식으로 변환합니다
- 입력 데이터 검증을 수행하거나 요청을 처리하게 됩니다.
predict_fn(input_data, model):- 실제 모델 추론을 실행하는 함수입니다
- 전처리된 입력 데이터(input)를 받아 모델을 통해 예측을 수행합니다
- 프롬프트 타입에 따라 다른 추론 방식을 적용합니다
output_fn(prediction_output, accept):배포를 위한inference.py테스트 코드는 다음과 같습니다.- 모델의 예측 결과를 클라이언트가 이해할 수 있는 형식으로 변환합니다.
import json
import base64
import logging
import numpy as np
from PIL import Image
from io import BytesIO
from ultralytics import SAM

# 로거 설정
logger = logging.getLogger(__name__)
logging.basicConfig(level=logging.INFO)

def model_fn(model_dir):
    try:
        # Load a model
        model = SAM("sam2_l.pt")
        logger.info("Model loaded successfully")
        return model
    except Exception as e:
        logger.error(f"Error loading model: {str(e)}")
        raise

def input_fn(request_body, request_content_type):
    """
    입력 데이터를 처리하는 함수

    예상되는 JSON 형식:
    {
        "image": "base64로 인코딩된 이미지 또는 이미지 경로",
        "prompt_type": "point" 또는 "bbox",
        "points": [x, y] 또는 null,
        "labels": [1] 또는 null,
        "bbox": [x1, y1, x2, y2] 또는 null
    }
    """
    if request_content_type == 'application/json':
        try:
            # JSON 데이터 파싱
            request = json.loads(request_body)

            # 이미지 처리
            image = request.get("image")
            if image.startswith('data:image'):  # base64 이미지
                # base64 이미지 디코딩
                image_data = base64.b64decode(image.split(',')[1])
                image = Image.open(BytesIO(image_data))
            else:  # 이미지 경로
                image = Image.open(image)

            # RGB로 변환
            image = image.convert('RGB')
            # numpy 배열로 변환
            image = np.array(image)

            # 프롬프트 타입 확인
            prompt_type = request.get("prompt_type")

            result = {
                "image": image,
                "prompt_type": prompt_type
            }

            # 포인트 프롬프트 처리
            if prompt_type == "point":
                points = request.get("points")
                labels = request.get("labels", [1])  # 기본값 1
                if points:
                    result["points"] = points
                    result["labels"] = labels

            # 바운딩 박스 프롬프트 처리
            elif prompt_type == "bbox":
                bbox = request.get("bbox")
                if bbox:
                    result["bbox"] = bbox

            return result

        except json.JSONDecodeError:
            raise ValueError("Invalid JSON input")
        except Exception as e:
            raise ValueError(f"Error processing input: {str(e)}")
    else:
        raise ValueError(f"Unsupported content type: {request_content_type}")

def predict_fn(input_data, model):
   """
   모델 추론을 수행하는 함수
   """
   try:
       image = input_data["image"]
       prompt_type = input_data["prompt_type"]

       if prompt_type == "point":
           results = model(
               image,
               points=input_data["points"],
               labels=input_data["labels"]
           )
       elif prompt_type == "bbox":
           results = model(
               image,
               bboxes=input_data["bbox"]
           )
       else:
           raise ValueError(f"Unsupported prompt type: {prompt_type}")

       # 원본 이미지도 함께 반환
       return results, image

   except Exception as e:
       raise RuntimeError(f"Error during prediction: {str(e)}")

def output_fn(prediction_output, accept):
   """
   모델 출력을 처리하고 마스크와 마스킹된 최종 이미지를 반환하는 함수
   """
   if accept == 'application/json':
       try:
           # 예측 결과와 원본 이미지 분리
           results, original_image = prediction_output
           masks = results[0].masks.data.cpu().numpy()

           # 마스크 처리
           mask = masks[0]  # 첫 번째 마스크 사용
           mask_image = (mask * 255).astype(np.uint8)
           bool_mask = mask_image > 127

           # 마스크 이미지를 base64로 인코딩
           mask_pil = Image.fromarray(mask_image)
           buffered = BytesIO()
           mask_pil.save(buffered, format="PNG")
           mask_base64 = base64.b64encode(buffered.getvalue()).decode()

           # 오버레이 이미지 생성
           overlay = original_image.copy()
           overlay[bool_mask] = [255, 0, 0]  # 빨간색으로 마스크 표시

           # 합성 이미지 생성
           alpha = 0.5
           blended = (original_image * (1-alpha) + overlay * alpha).astype(np.uint8)

           # 최종 이미지를 base64로 인코딩
           final_image = Image.fromarray(blended)
           buffered = BytesIO()
           final_image.save(buffered, format="PNG")
           result_base64 = base64.b64encode(buffered.getvalue()).decode()

           # 결과를 JSON 형식으로 구성
           response = {
               "mask": mask_base64,
               "result_image": result_base64
           }

           return json.dumps(response)

       except Exception as e:
           raise RuntimeError(f"Error processing prediction output: {str(e)}")
   else:
       raise ValueError(f"Unsupported accept type: {accept}")
실제 inference가 정상적으로 동작하는지 확인해볼 수 있습니다.
test_input 은 두 가지가 존재합니다. points를 주는 방식과 bodering box를 주는 방식으로 해당 객체를 감지하거나 박스안에 있는 객체들을 전부 탐지할 수 있습니다.
import os
import sys
import json
import base64
from PIL import Image
from io import BytesIO
from model.inference import model_fn, input_fn, predict_fn, output_fn

# 테스트 입력
test_input = {
    "image": "./images/groceries.jpg",
    "prompt_type": "point",
    "points": [553, 258],
    "labels": [1]
}

# test_input = {
#   "image": "./images/groceries.jpg",
#    "prompt_type": "bbox",
#    # 좌상단(x1,y1)과 우하단(x2,y2) 좌표로 변환
#    "bbox": [365, 128, 630, 334]  # [x1, y1, x2, y2]
# }

# 파이프라인 실행
model = model_fn("")
processed_input = input_fn(json.dumps(test_input), 'application/json')
prediction = predict_fn(processed_input, model)
result = output_fn(prediction, 'application/json')

# 결과 확인 및 이미지 시각화
result_dict = json.loads(result)

# 마스크 이미지 디코딩 및 표시
mask_base64 = result_dict["mask"]
mask_data = base64.b64decode(mask_base64)
mask_image = Image.open(BytesIO(mask_data))
mask_image.show()  # 마스크 이미지 표시

# 최종 마스킹 이미지 디코딩 및 표시
result_image_base64 = result_dict["result_image"]
result_data = base64.b64decode(result_image_base64)
result_image = Image.open(BytesIO(result_data))
result_image.show()  # 최종 마스킹 이미지 표시
출력 결과는 다음과 같습니다.
실제 마스킹된 이미지를 덧씌워 이미지를 식별합니다.
실제 코드가 정상적으로 동작하는 것을 확인하였으면 sagemaker로 배포합니다. 모델을 직접 패키징하여 s3에 올린 후 접근하거나 image로 빌드하여 image_uri를 전달하는 방식으로 구성할 수 있지만 환경 종속성이 없고 간단한 테스트를 위해 모델 자체를 tarball로 압축하여 s3로 업로드 하였습니다. 이때 모델 뿐만 아니라 앞서 테스트한 inference.py 파일도 추가하여 모델이 어떻게 호출되며 값을 반환하는지와 실제 모델을 추가하여 배포를 진행할 수 있도록 합니다.
코드는 다음과 같습니다.
- 노트북과 같은 경로의
model폴더에 필요한 checkpoints의 파일과 inference를 추가합니다. model.tar.gz파일로 압축합니다.
import os
import tarfile
import sagemaker
from datetime import datetime

# SageMaker 세션 생성
sagemaker_session = sagemaker.Session()
bucket = sagemaker_session.default_bucket()  # 기본 SageMaker 버킷
role = sagemaker.get_execution_role()

def create_model_tarball():
    """모델 파일들을 tarball로 압축"""
    with tarfile.open('model.tar.gz', 'w:gz') as tar:
        # inference.py 추가
        tar.add('model/inference.py', arcname='inference.py')

        # sam2_l.pt 모델 파일 추가
        tar.add('model/sam2_l.pt', arcname='sam2_l.pt')

        # requirements 추가
        tar.add('model/requirements.txt', arcname='requirements.txt')

def upload_to_sagemaker_s3():
    """압축된 모델을 SageMaker S3 버킷에 업로드"""
    try:
        s3_prefix = f'sam2-model'

        # S3에 업로드
        model_s3_uri = sagemaker_session.upload_data(
            'model.tar.gz',
            bucket=bucket,
            key_prefix=s3_prefix
        )

        print(f'Model uploaded to: {model_s3_uri}')
        return model_s3_uri

    except Exception as e:
        print(f'Error uploading to S3: {str(e)}')
        raise

# 실행
try:
    # 모델 압축
    print("Creating model tarball...")
    create_model_tarball()
    print("Model tarball created successfully")

    # S3에 업로드
    print("Uploading to S3...")
    model_s3_uri = upload_to_sagemaker_s3()
    print("Upload completed successfully")

    # 임시 파일 정리
    os.remove('model.tar.gz')
    print("Temporary files cleaned up")

except Exception as e:
    print(f"Error: {str(e)}")
s3에 업로드하였다면 실제 sagemaker 모델이 가져와 endpoint로 구성할 수 있도록 코드를 작성해야합니다.
이때 sagemaker에서는 모델의 프레임워크에 따라 sdk를 제공하고 있습니다. sdk로는 sagemaker가 수임할 수 있는 역할, 압축된 tarball 파일의 경로를 추가합니다.
from sagemaker.pytorch import PyTorchModel

model = PyTorchModel(
    source_dir='./model',
    model_data=model_s3_uri,
    role=role,
    entry_point='inference.py',
    framework_version='2.3.0',
    py_version='py311',
    sagemaker_session=sagemaker_session,
    # dependencies=["requirements.txt"]
    # image_uri='763104351884.dkr.ecr.ap-northeast-2.amazonaws.com/huggingface-pytorch-inference:2.0.0-transformers4.28.1-cpu-py310-ubuntu20.04'
)
이후 해당 모델이 배포될 인스턴스 타입과 엔드포인트 네임을 지정한 뒤 deploy합니다.
INSTANCE_TYPE = 'ml.g4dn.xlarge'
ENDPOINT_NAME = 'sam2-pytorch' + str(datetime.utcnow().strftime('%Y-%m-%d-%H-%M-%S-%f'))

# Store the endpoint name in the history to be accessed by 2_TestEndpoint.ipynb notebook
%store ENDPOINT_NAME
print(f'Endpoint Name: {ENDPOINT_NAME}')

predictor = model.deploy(initial_instance_count=1, instance_type=INSTANCE_TYPE, endpoint_name=ENDPOINT_NAME)
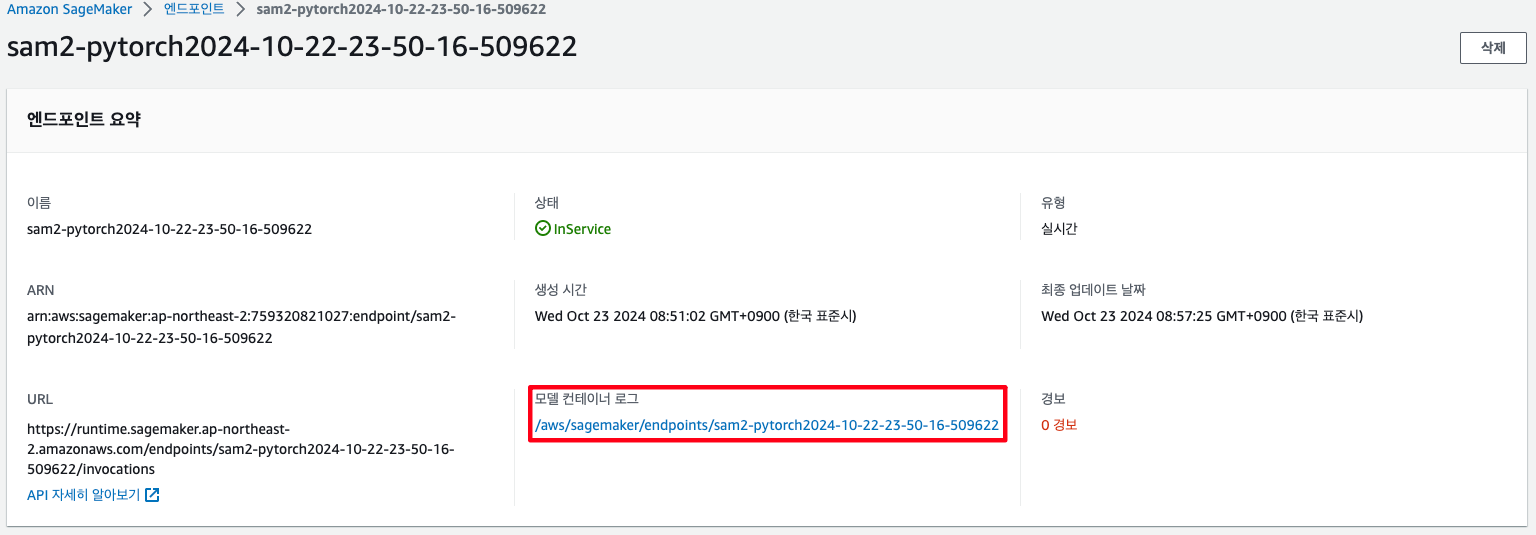
Endpoint Name: sam2-pytorch2024-10-22-23-50-16-509622
------------!
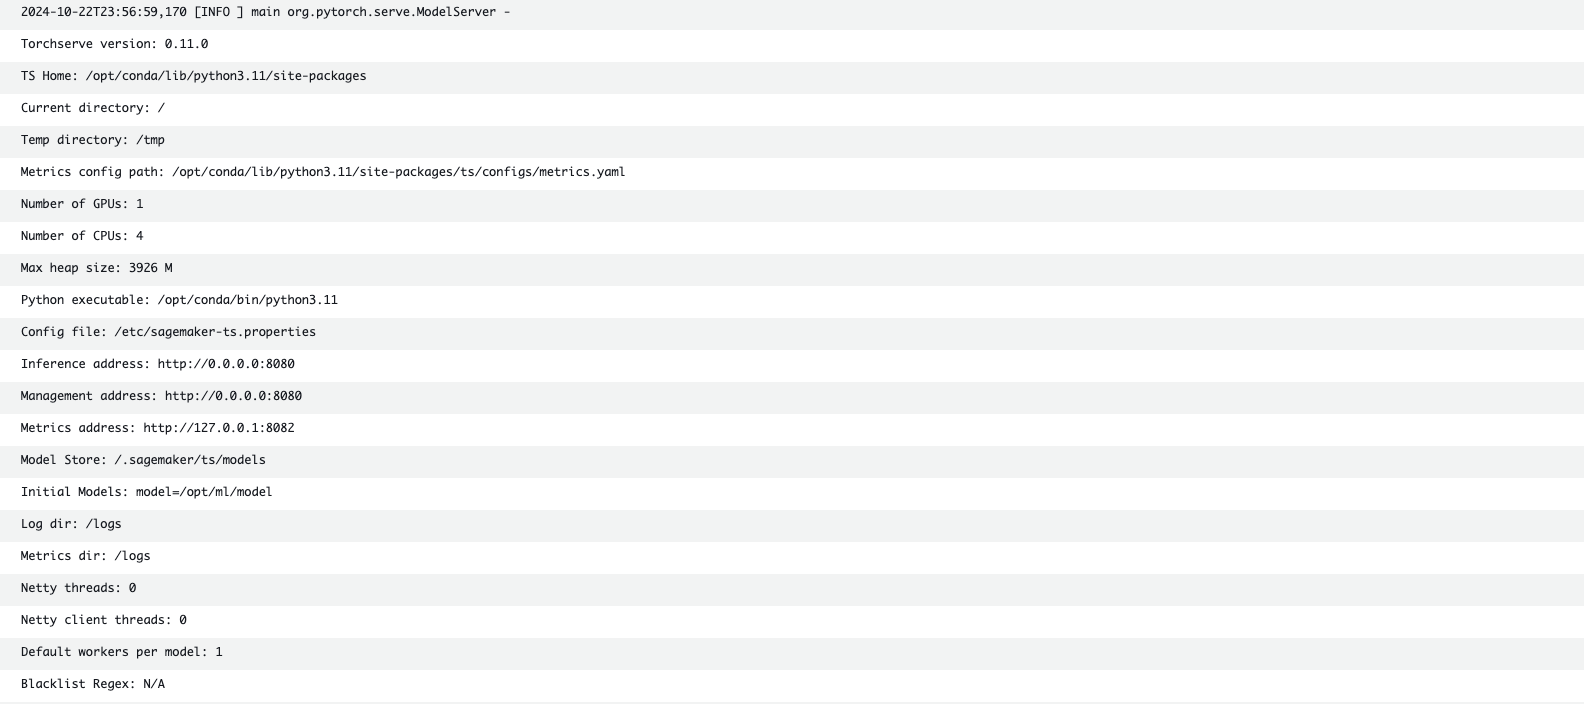
모델이 배포되는 과정은 모델 컨테이너 로그에서 확인해볼 수 있으며, 이 과정에서 model_fn이 호출됩니다.
이때 modelfn은 반드시 modeldir을 가져야하며 해당 경로를 통해 모델을 찾아오게 되지만, 현재 문서에서는 tarball 파일 자체에서 가져오기 때문에 파라미터를 사용하지 않고 할당하였습니다.
다른 함수들은 필수적인 파라미터를 갖지 않지만 inputfn → predictfn → output_fn이 연속적으로 호출되는 만큼 해당 값에 신경써야합니다.
그렇게 배포가 완료되었다면 호출할 수 있습니다.
배포된 inference 코드에서 최종 결과가 base64 인코딩되어 리턴되기 때문에 디코딩 되어야하며 테스트 코드는 다음과 같습니다.
import json
import base64
from PIL import Image
import requests
import boto3
from io import BytesIO

def encode_image_to_base64(image_path):
    """이미지를 base64로 인코딩하고 data:image 접두어 추가"""
    # 이미지 파일 확장자 확인
    image_extension = image_path.split('.')[-1].lower()
    mime_type = f'image/{image_extension}'
    if image_extension == 'jpg':
        mime_type = 'image/jpeg'

    with open(image_path, 'rb') as image_file:
        encoded_string = base64.b64encode(image_file.read()).decode('utf-8')
        return f'data:{mime_type};base64,{encoded_string}'

def invoke_endpoint(endpoint_name, image_path, prompt_type, points=None, labels=None, bbox=None):
    """SageMaker 엔드포인트 호출"""
    # 이미지를 base64로 인코딩 (접두어 포함)
    image_base64 = encode_image_to_base64(image_path)

    # 기본 payload 구성
    payload = {
        "image": image_base64,
        "prompt_type": prompt_type
    }

    # prompt_type에 따라 추가 데이터 설정
    if prompt_type == "point" and points is not None:
        payload["points"] = points
        payload["labels"] = labels
    elif prompt_type == "bbox" and bbox is not None:
        payload["bbox"] = bbox

    # SageMaker 런타임 클라이언트 생성
    runtime = boto3.client('sagemaker-runtime', region_name='ap-northeast-2')

    try:
        # 엔드포인트 호출
        response = runtime.invoke_endpoint(
            EndpointName=endpoint_name,
            ContentType='application/json',
            Body=json.dumps(payload)
        )

        # 응답 처리
        result = json.loads(response['Body'].read())
        return result

    except Exception as e:
        print(f"Error invoking endpoint: {str(e)}")
        raise
최종 결과를 출력하면 다음과 같습니다.
import base64
from PIL import Image
import matplotlib.pyplot as plt
import matplotlib.patches as patches # patches import 추가
from io import BytesIO
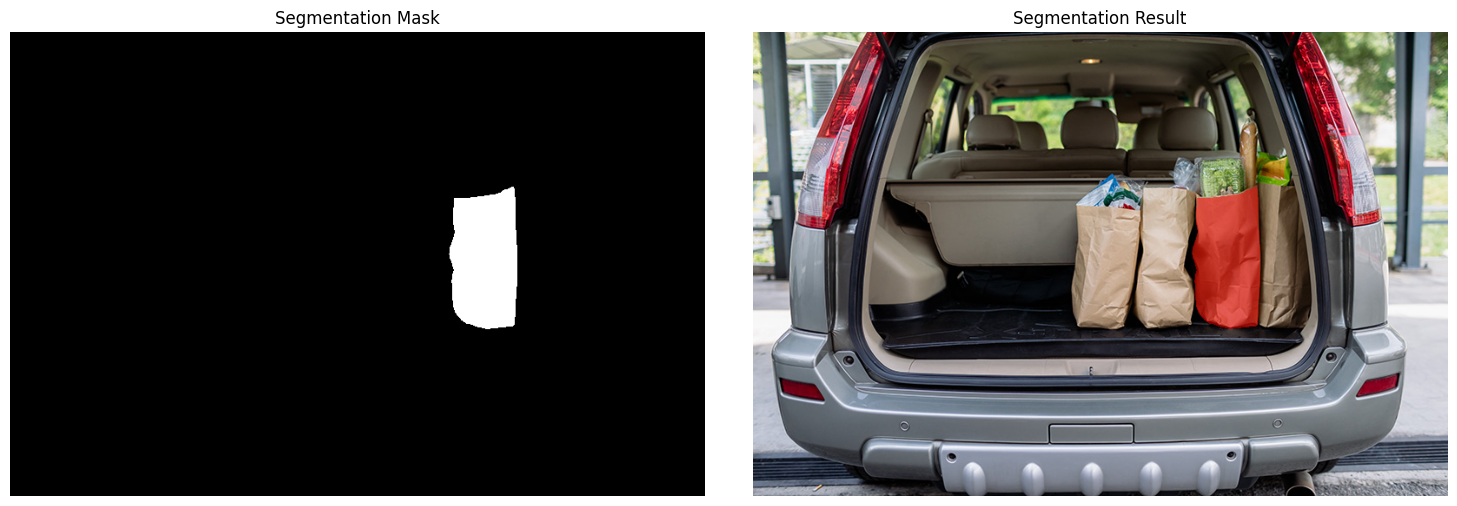
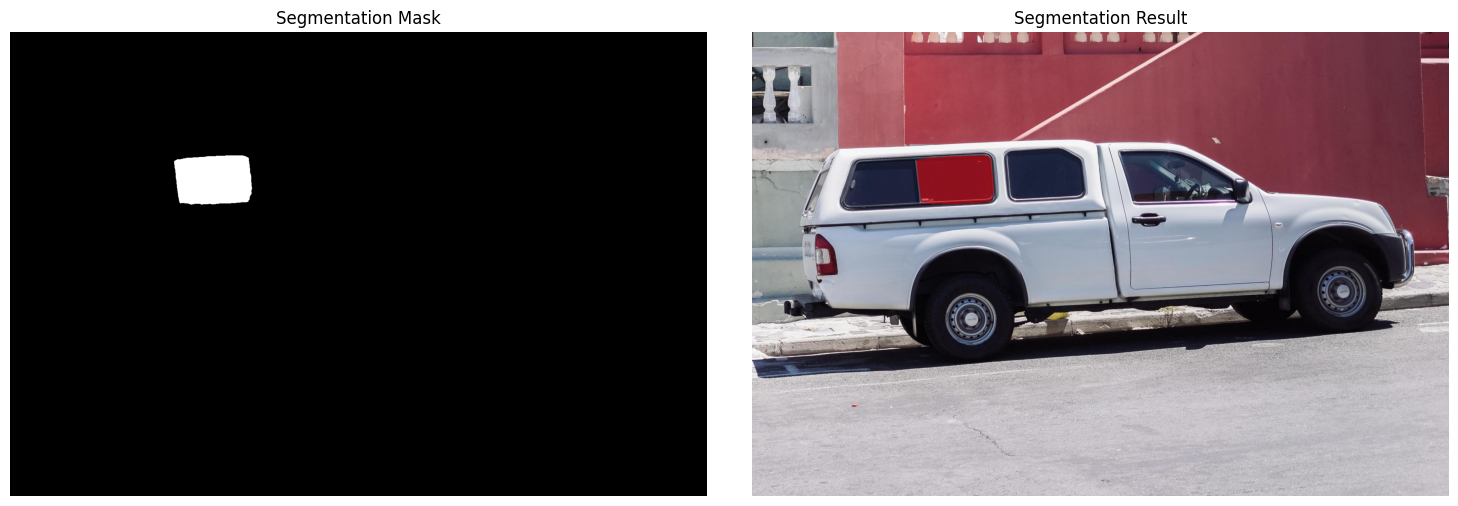
# Point 방식 사용 예시
# points와 labels가 필요합니다.
ENDPOINT_NAME = 'sam2-pytorch2024-10-22-23-50-16-509622'
image_path = './images/truck.jpg'
points = [[500, 375], [1125, 625]]
labels = [1, 0]
result = invoke_endpoint(
endpoint_name=ENDPOINT_NAME,
image_path=image_path,
prompt_type='point',
points=points,
labels=labels
)
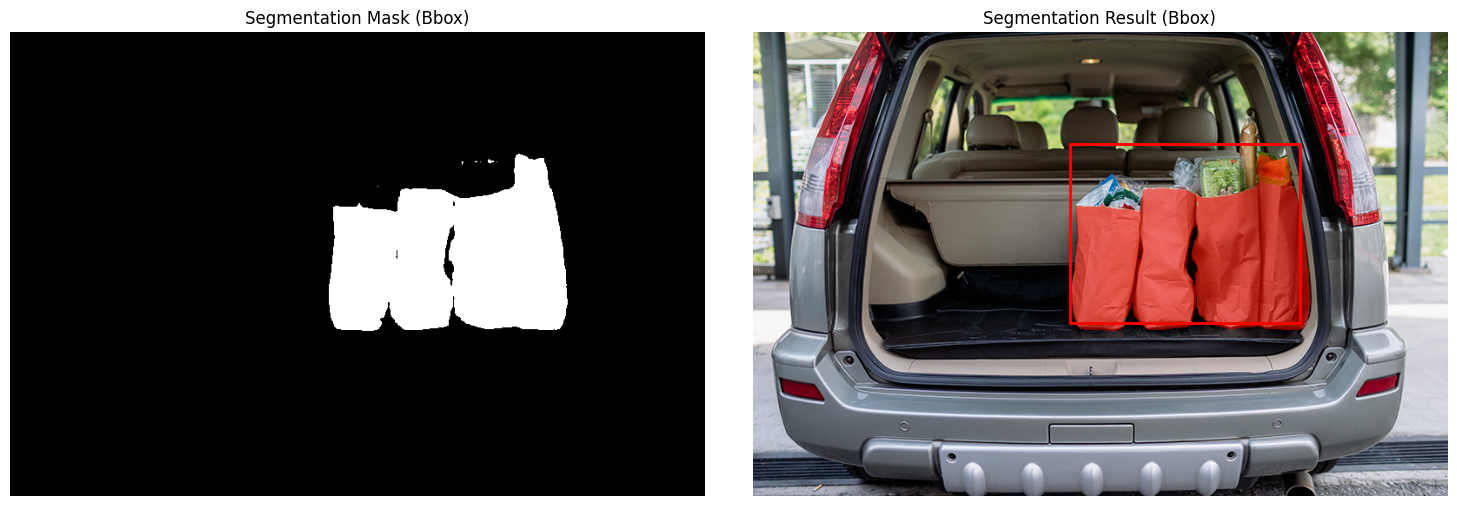
# Bbox 방식 사용 예시
# bbox_coords가 필요합니다.
bbox_coords = [150, 200, 1100, 750] # [x1, y1, x2, y2]
result_bbox = invoke_endpoint(
endpoint_name=ENDPOINT_NAME,
image_path=image_path,
prompt_type='bbox',
bbox=bbox_coords
)
# 마스크와 결과 이미지 디코딩
mask_data = base64.b64decode(result['mask'])
result_data = base64.b64decode(result['result_image'])
# 이미지로 변환
mask_image = Image.open(BytesIO(mask_data))
result_image = Image.open(BytesIO(result_data))
# 시각화
plt.figure(figsize=(15, 5))
# 마스크 이미지
plt.subplot(1, 2, 1)
plt.imshow(mask_image, cmap='gray')
plt.title('Segmentation Mask')
plt.axis('off')
# 결과 이미지
plt.subplot(1, 2, 2)
plt.imshow(result_image)
plt.title('Segmentation Result')
plt.axis('off')
plt.tight_layout()
plt.show()
# 마스크와 결과 이미지 디코딩
mask_data = base64.b64decode(result_bbox['mask'])
result_data = base64.b64decode(result_bbox['result_image'])

# 이미지로 변환
mask_image = Image.open(BytesIO(mask_data))
result_image = Image.open(BytesIO(result_data))

# 시각화
plt.figure(figsize=(15, 5))

# 마스크 이미지
plt.subplot(1, 2, 1)
plt.imshow(mask_image, cmap='gray')
plt.title('Segmentation Mask (Bbox)')
plt.axis('off')

# 결과 이미지
plt.subplot(1, 2, 2)
plt.imshow(result_image)
plt.title('Segmentation Result (Bbox)')
Reference
https://dev.to/victorisaacking/how-to-deploy-segment-anything-model-2-sam-2-with-modelbit-47ni
![[SageMaker] SageMaker Jumpstart를 사용한 LLM Fine Tuning - Supervised fine tuning (SFT)](https://images.unsplash.com/photo-1648652678596-d3873bd0c157?crop=entropy&cs=tinysrgb&fit=max&fm=jpg&ixid=M3wxMTc3M3wwfDF8c2VhcmNofDQ2fHxTdXBlcnZpc2VkfGVufDB8fHx8MTc1MzgzMTg2Mnww&ixlib=rb-4.1.0&q=80&w=960)
![[SageMaker] SageMaker Jumpstart를 사용한 LLM Fine Tuning - DAFT(Domain-Agnostic Fine-Tuning)](https://images.unsplash.com/photo-1563207769-3343cb585fcb?crop=entropy&cs=tinysrgb&fit=max&fm=jpg&ixid=M3wxMTc3M3wwfDF8c2VhcmNofDZ8fHR1bmluZ3xlbnwwfHx8fDE3NTM4MzE2Mjl8MA&ixlib=rb-4.1.0&q=80&w=960)
![[SageMaker] SageMaker Jumpstart Evaluation(Ground Truth)을 구성하여 사람이 LLM 평가하기](https://images.unsplash.com/photo-1632144130358-6cfeed023e27?crop=entropy&cs=tinysrgb&fit=max&fm=jpg&ixid=M3wxMTc3M3wwfDF8c2VhcmNofDN8fEh1bWFuJTIwRmVlZGJhY2t8ZW58MHx8fHwxNzUzODMxNDUwfDA&ixlib=rb-4.1.0&q=80&w=960)
